Introduction
Learning how to draw kuromi is a playful way to turn simple shapes into a cute, mischievous character that kids and beginners can draw with confidence. In this cheerful step-by-step guide, you’ll learn how to draw kuromi using a circle for the head, an oval for the body, and smooth curves for her jester-style hood and tall ears. We’ll place friendly eyes, a tiny oval nose, and Kuromi’s signature pink skull, then add small details like the pom-pom ends and a cheeky smile.
Each step is short and clear: sketch light guides first, refine clean outlines next, and finish with easy shading and color so your drawing pops. You’ll also pick up quick fixes for common mistakes, ears that look uneven, a skull that sits too high, or eyes that feel too far apart, plus simple tips to keep proportions balanced. Prefer a sitting or waving pose? We’ll show both, and you can personalize your Kuromi with a bow, cupcake, or tiny star wand. No special tools are needed; a pencil, eraser, and colored pencils or crayons are perfect.
By the end, you’ll have a bright, confident Kuromi drawing you’ll be proud to share, and the skills to sketch more Sanrio favorites using the same shapes-outline-color method.

Are you ready to draw one of the sassiest and cutest Sanrio characters ever? 🎀 If you’ve been wondering how to draw Kuromi, this easy drawing tutorial is the perfect place to start!
Table of Contents
Materials Needed 🎨
Before we start our step-by-step drawing, let’s make sure you have everything you need! You don’t need anything fancy, just a few basic tools to bring your drawing to life:
✅ Paper or Sketchbook – A blank page for your drawing. 📄
✅ Pencils (HB or 2B) – Light pencils help with outlining the drawing. ✏️
✅ Eraser – To fix mistakes while sketching. 🔄
✅ Black Marker or Fine Liner – For outlining and defining clearly. ✍️
✅ Colored Pencils – To color your drawing.
Now, let’s learn how to draw Kuromi step by step…
How to Draw Kuromi Step by Step
Learning how to draw Kuromi is such a fun and awesome way to practice your drawing skills! You’ll get to work on making big shapes for her head and body, and also draw her cute, soft features and big ears.

It’s a great project for young artists who want to create their very own cartoon character!
Step 1. Draw Kuromi’s Head 🖤
1️⃣ Let’s begin our awesome adventure on how to draw Kuromi! To start, we’re going to draw a big, rounded oval for her head. Her head is the biggest part of her body, so make it nice and large! The top of her head is also a little bit wider than the bottom, giving her that perfectly cute shape.
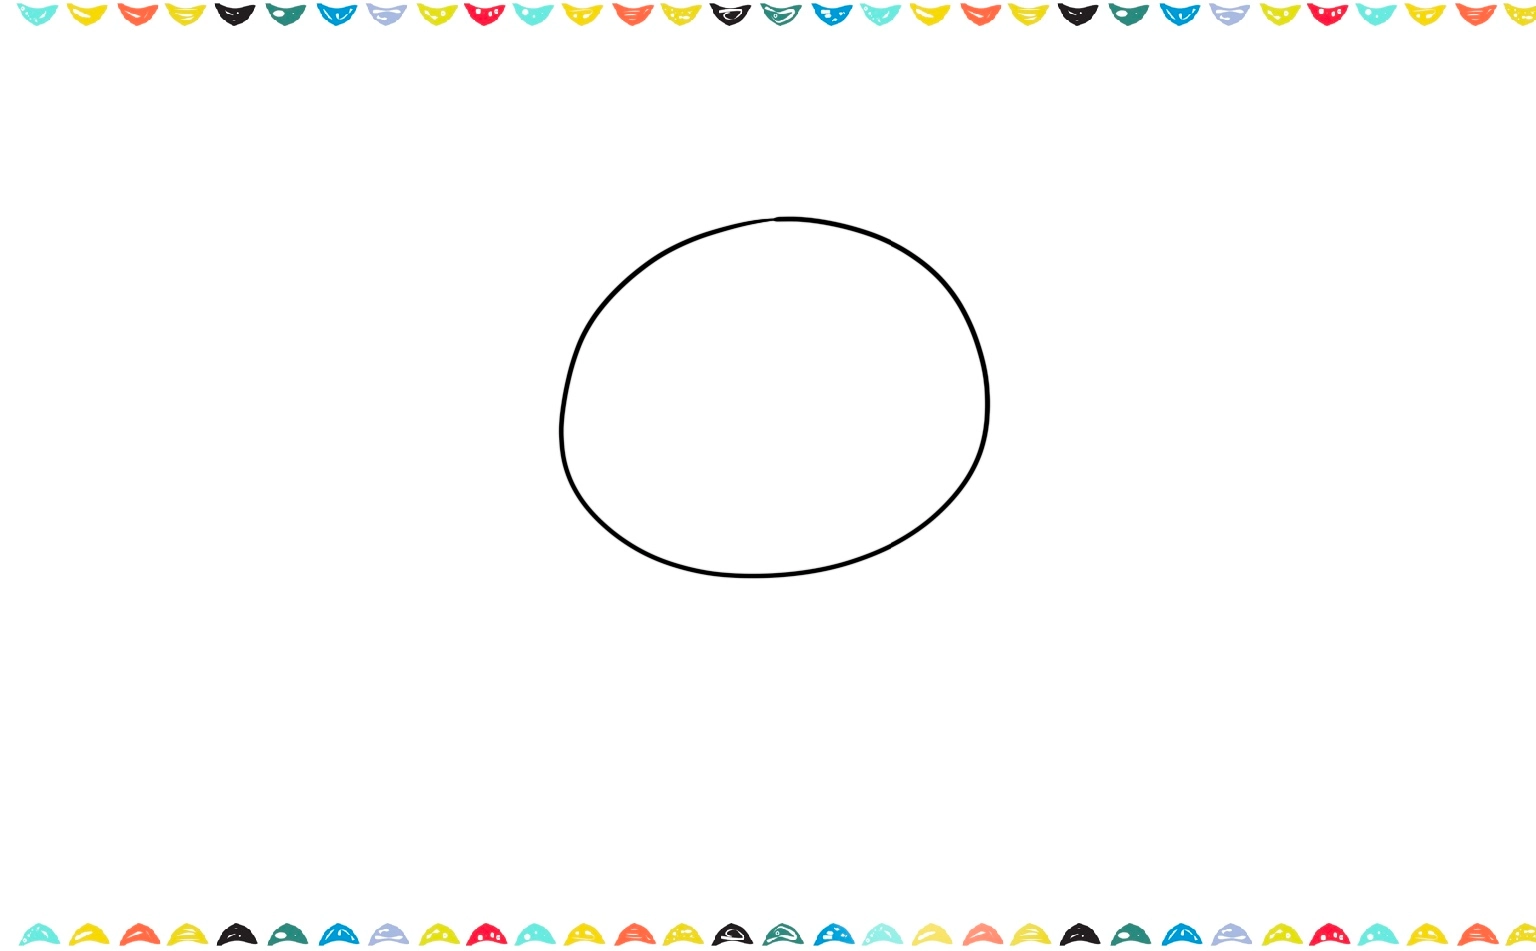
2️⃣ Now we’ll add the best part of her look! At the top corners of her head, draw two sharp, pointy triangles. These aren’t just ears, they’re actually the fun, floppy points of her jester-style hat!

3️⃣ Let’s add a tiny circle to the very tip of each of her ears! These little circles are the special jingle bells that give her that classic, mischievous look. We’ll color them in later!
4️⃣Ready for the next step? Let’s keep going with our guide on how to draw Kuromi by giving her a face! We’ll carefully sketch her eyes, nose, and mischievous mouth to show off her fun personality.
Step 2. Add Kuromi’s Face 😊
1️⃣ Let’s give Kuromi her famous expression! Inside the head, draw two big, cute eyes, with one on each side. Now for the secret to her look: make the outside corners of the eyes slant down a little. This simple trick will give her that super cool, confident, sassy expression she’s known for!

2️⃣ Let’s add a super cute detail that gives Kuromi her sassy look! Draw a couple of small, curved eyelashes right on the top outer corners of her eyes. This is a fun and easy step in our guide on how to draw Kuromi to make her eyes pop!

3️⃣ Right between her big eyes, let’s draw a small oval for her nose. Then, just below that, give her a little smirking smile. This is the secret to getting that perfect, playful look we all love! 😏

4️⃣ You’re doing such an amazing job! Let’s keep going with our guide on how to draw Kuromi. Now comes the fun part: adding all her cool skull accessories to make her look extra awesome and mischievous!
Step 3. Sketch the Skull Accessory 💀
1️⃣ Right in the middle of Kuromi’s forehead, draw her signature pink skull. Start with a small oval and add two black eyes and a cute little nose. This gives her that edgy yet adorable style.

2️⃣ Now for one of the most important parts of her look! Kuromi’s iconic jester hat. Draw a jester hat to give her that mischievous style we all love!

3️⃣ Now for one of Kuromi’s most important accessories! Let’s give her a big, cute bow right above the skull. Make sure you draw it so it sits perfectly between her ears, just like you see in the picture. This special detail is a key part of learning how to draw Kuromi!
4️⃣ If you want to learn how to draw a bow in detail, check our blog post: How to Draw a Bow.
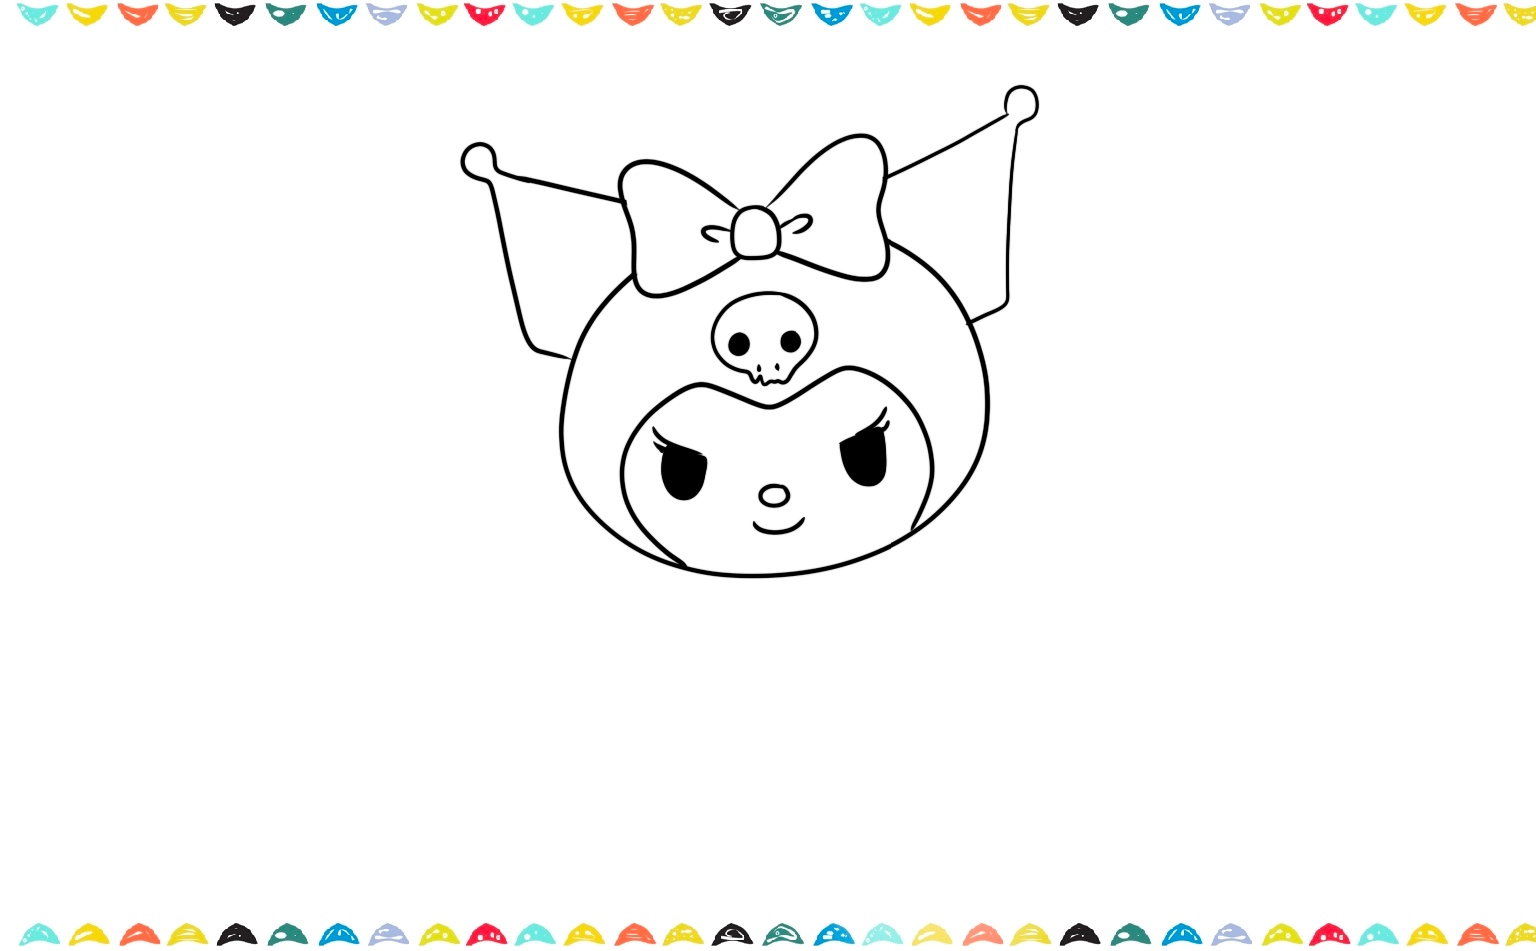
💖Now that we’ve finished her head, let’s keep going! It’s time to learn how to draw Kuromi’s body, which is super fun and simple. We’ll get her whole cool outfit ready to go on the page!
Step 4. Draw the Body 🧍♀️
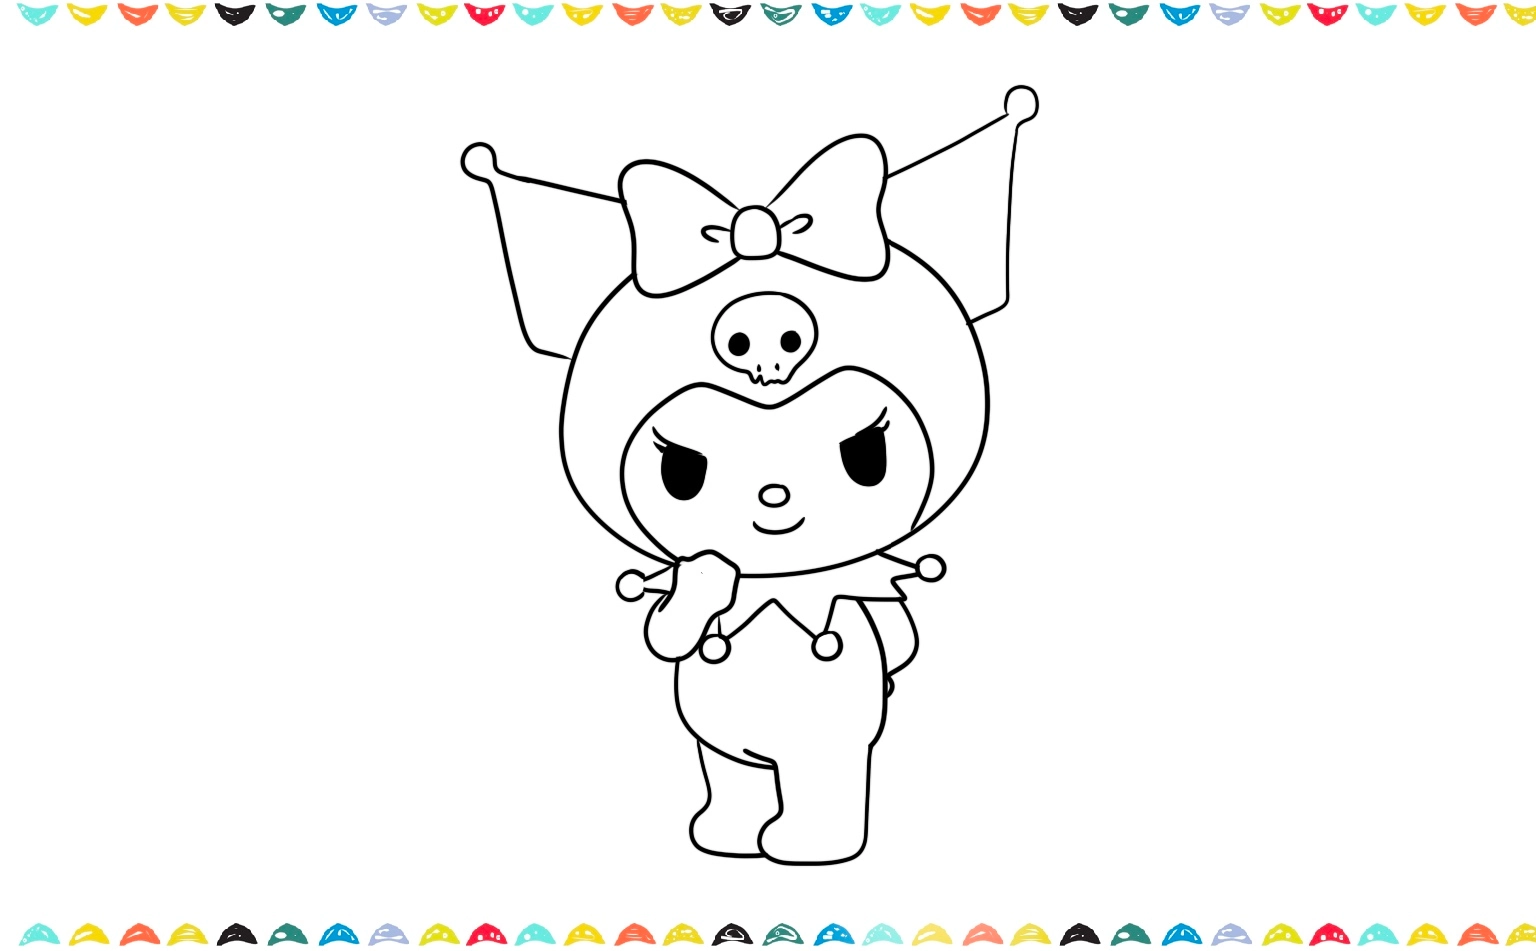
1️⃣ Now draw a small oval below her head to form Kuromi’s body. Her body is short and rounded, making her look like a plush doll.

2️⃣ Add two small curves for her arms and rounded feet pointing slightly outward. Kuromi’s body is simple, so don’t overthink it, just keep the shapes soft and round.

Want more practice with simple shapes after how to draw Kuromi? Learn How to Draw a Tree step by step.
Step 5. Add Her Collar and Tail 🧷
1️⃣ Now let’s add one of the coolest parts of our Kuromi drawing, her spiky jester-style collar! Right at her neck, draw three little triangles pointing down. To make it extra special, draw a small pink circle at the end of each triangle, just like cute little bells. This detail will make your Kuromi look just right!
2️⃣ Now, let’s keep learning how to draw Kuromi by adding her awesome little tail! We’ll sketch a cute, curved tail that ends with a sharp, heart-like triangle at the very back. This special tail is what gives her that perfectly mischievous charm!
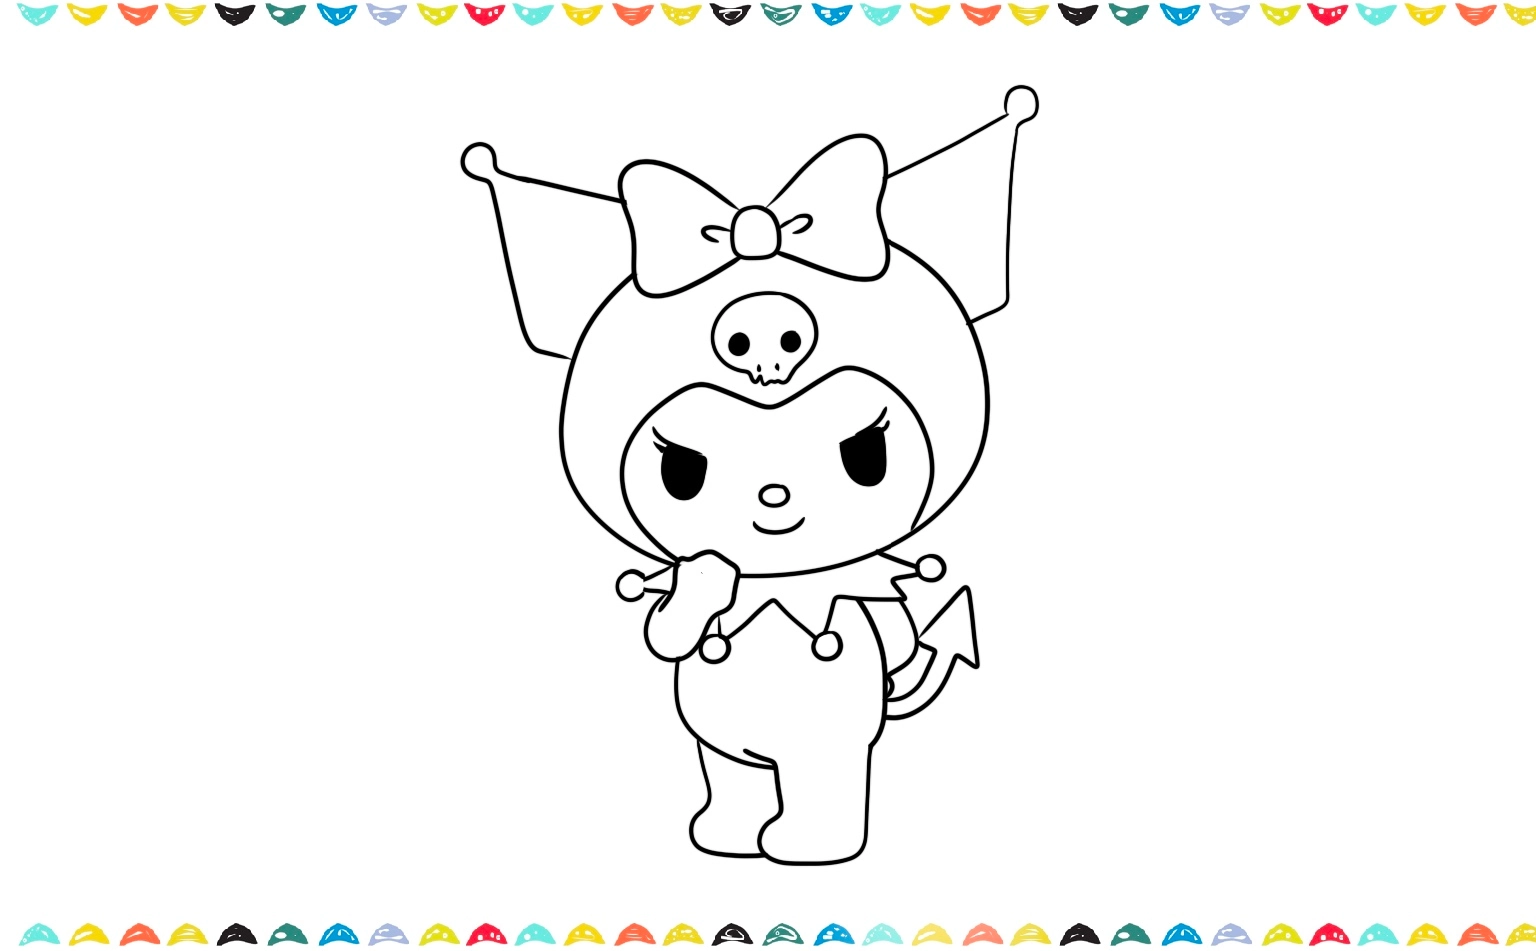
3️⃣ As you add all of those fun little details, like her mischievous smile and her cute skull bow, you’ll see your drawing really come to life! You’ll find that the whole journey of learning how to draw Kuromi is a super creative and rewarding adventure.
Step 6. Outline the Details 🖊️
1️⃣ Now that the full form is ready, go over the lines with a dark pencil or black pen. Erase any extra sketch lines and clean up your drawing. This will help your Kuromi look crisp and cartoon-perfect.
Step 7. Color Your Kuromi Drawing 🎨
1️⃣ Time to bring Kuromi to life with color! Here’s the classic Kuromi color palette:

- Black for the hat and ears 🖤
- White for the face and body 🤍
- Pink for the bow, skull, cheeks, and jester bells 🎀
- Dark gray for her tail
2️⃣ Use colored pencils, crayons, or markers. Feel free to experiment and turn it into a kawaii Kuromi drawing with your own twist!
You’ve done it! And that’s it! You now know how to draw Kuromi step by step! 🎉 If you like this tutorial you may also like our step by step drawing tutorials about How to Draw Hello Kitty or How to Draw Angel.
Fun Facts About Kuromi 🌟
Now that you know how to draw Kuromi, let’s explore some fun Kuromi facts! Want to impress your friends with cool Kuromi knowledge while you color? Here are some fun facts! 😄
- Kuromi is My Melody’s rival, but deep down, they’re good friends!
- She loves punk rock, journaling, and writing in her diary. 🖤📓
- Her birthday is Halloween, October 31st! 🎃
- Kuromi may look tough, but she actually loves cute things and romance novels! 💕
- She has her own gang called the Kuromi 5! 😎
Now it’s time to have some fun learning how to draw Kuromi! This step-by-step guide is the perfect way to bring this mischievous character to life on paper, whether you’re just starting your drawing journey or you’re already a master artist. If you want to learn more about Kuromi: check Kuromi: All You Need to Know.
Frequently Asked Questions ❓
Q1: How to draw Kuromi step by step for beginners?
A1: Start with basic shapes like ovals and triangles. Our 7-step tutorial makes it super simple, even for first-time artists!
Q2: How can I make a cute Kuromi drawing?
A2: Focus on big eyes, soft lines, and her signature accessories like the pink bow and skull. Follow the coloring tips too!
Q3: What colors should I use for Kuromi?
A3: Use black for her ears and outfit, white for her body, and pink for her bow, cheeks, and skull. These are her classic colors!
Q4: How to draw Kuromi easy for kids?
A4: Keep it simple! Use large shapes, cartoon-like proportions, and skip tiny details. Our guide is perfect for kids to follow!
Q5: Can I draw Kuromi in 5 minutes?
A5: Yes! If you follow the basic outline and skip some of the tiny extras, you can totally draw in 5 minutes with practice!
Conclusion: You Did It, Artist! 🎨
Awesome job, artist! You’ve just learned how to draw a Kuromi from start to finish! 💖🎨 Isn’t she the cutest punk princess ever?
Way to go! The more you practice how to draw Kuromi, the better you’ll get. Try drawing her in different poses, like dancing or giving a mischievous wink! Remember, drawing is all about using your imagination, and with a few simple steps, you can draw anything you dream up.
👉 Love this lesson? Don’t stop here! Explore more of our tutorials like How to Draw Lightning McQueen, How to Draw a Unicorn or How to Draw Labubu to complete your art collection. You can even combine them all into one big drawing idea for an awesome scene!
👉 For artists who love animal drawing ideas, visit our step-by-step tutorials on How to Draw a Crab, How to Draw a Sea Turtle or How to Draw a Giraffe are another fun projects to try next. 🌟
Looking for creative inspiration? Check out our Pinterest page for some magical ideas!
Keep drawing and having fun with it, just like playing your favorite game every day! The more you draw, the better you’ll get, and you might even discover new ways to draw that you never knew before. Check out our blog post about Drawing Ideas for Beginners – 100 Easy and Fun Things to Draw for more inspiration about drawing.
Share Your Drawing With Us! 💯🎁
We’d love to see your amazing artwork! When you finish your drawing, send us a picture of it. Whether it’s your first try or your masterpiece, we’re excited to cheer you on. Your creativity could even be featured on our site – so grab your crayons and show us what you’ve made! 🎉🖍️
Looking for more step-by-step drawing tutorials? Visit the A-Z Drawing Tutorials Index to browse all lessons, organized alphabetically.